
Thanks very much, Panzergator! I appreciate it.
I went to AOB in 1976 and learned then about the change from "Cherry Juice" to the green hydraulic fluid that looked like "Lime Juice". I also remember seeing a T-62 at Ft. Knox and the class got to go check it out.
When I went to AOAC in 1981-82 we had a pretty large contingent of Egyptian officers in our class as well as several other nationalities.
Pete's Place
Moderators: GHQ, dnichols, Mk 1
-
pmskaar
- E5
- Posts: 2273
- Joined: Sun Apr 17, 2005 5:45 am
Pete's Place
Here are my BRDM vehicles. I need to paint some of the various Soviet tanks, artillery, and other vehicles I have in my collection to get my Cold War Soviet force up to speed. I plan to use Fistful of TOWs 3 to do my games for this era.
GHQ's BRDM series are some of their older sculpts but still pretty good overall.

GHQ's BRDM series are some of their older sculpts but still pretty good overall.
-
PolishGI
- E5
- Posts: 833
- Joined: Wed Jun 19, 2013 2:57 am
- Location: SW USA
 Charlie don't surf!
-
Begemot
- E5
- Posts: 249
- Joined: Fri Aug 19, 2011 12:11 am
Pete - Great work. And you know what we want: More!
And what's this about a 50 picture tutorial?
Begemot
And what's this about a 50 picture tutorial?
Begemot
The summer grasses.
For many brave warriors
The aftermath of dreams.
--- Basho
Please visit my website "Lair of the Begemot": (https://lairbegemot.blogspot.com)
For many brave warriors
The aftermath of dreams.
--- Basho
Please visit my website "Lair of the Begemot": (https://lairbegemot.blogspot.com)
-
pmskaar
- E5
- Posts: 2273
- Joined: Sun Apr 17, 2005 5:45 am
Pete's Place
Hi Polish and Redleg! Thanks very much.
I will be getting another installment on my Facebook tutorial soon. If anyone is interested, I will consider offering a tutorial here as well. It is easier to post multiple photos on Facebook but I can do something here if people want it.
Thanks very much, Begemot! I am offering a tutorial on the Facebook site on how I paint my stuff. I get inquiries occasionally from people that are curious how I do things.
The 50 photo post was on how I do my German WWII three color camouflage.
I will be getting another installment on my Facebook tutorial soon. If anyone is interested, I will consider offering a tutorial here as well. It is easier to post multiple photos on Facebook but I can do something here if people want it.
Thanks very much, Begemot! I am offering a tutorial on the Facebook site on how I paint my stuff. I get inquiries occasionally from people that are curious how I do things.
The 50 photo post was on how I do my German WWII three color camouflage.
-
pmskaar
- E5
- Posts: 2273
- Joined: Sun Apr 17, 2005 5:45 am
Pete's Place
Here are a few pictures of my Russian T-34s. These depict the Model 42 that GHQ makes.
There is also a picture of a 1941/42 as well. I appreciate that GHQ offers several different types of 76mm armed T-34s and overall covers the type very well.
I offered these up on one of the 6mm sites on Facebook in answer to someone's question on how to paint WWII Russian tanks.


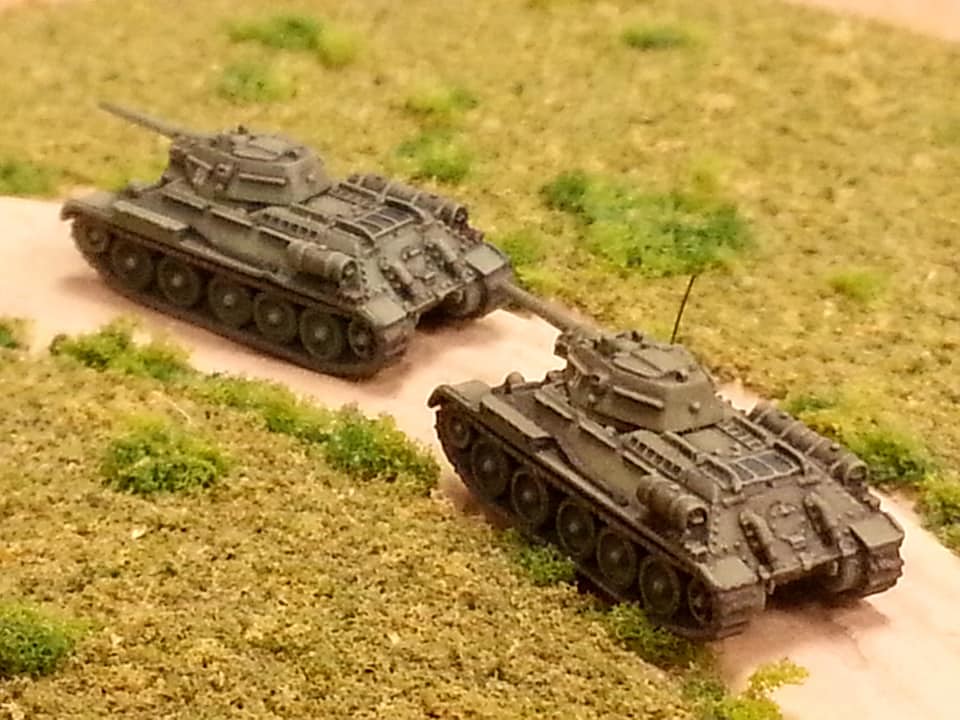

I took these photos a couple years ago. I now have a better cellphone camera and I have been working on taking better pictures.
There is also a picture of a 1941/42 as well. I appreciate that GHQ offers several different types of 76mm armed T-34s and overall covers the type very well.
I offered these up on one of the 6mm sites on Facebook in answer to someone's question on how to paint WWII Russian tanks.
I took these photos a couple years ago. I now have a better cellphone camera and I have been working on taking better pictures.
-
WWIICentral
- E5
- Posts: 169
- Joined: Sat Sep 03, 2011 6:59 am
- Contact:
Great work Pete! I have 2 questions for you:
1 - what's your process for removing mould lines? I can't see any trace of lines on those T-34's and the older I get, the harder it is to get those off it seems. Mould lines are my biggest pain in painting I'd say.
2 - do you have any terrain photos with water? I could use some inspiration for some water hexes.
Thanks again for sharing!
Tanner
1 - what's your process for removing mould lines? I can't see any trace of lines on those T-34's and the older I get, the harder it is to get those off it seems. Mould lines are my biggest pain in painting I'd say.
2 - do you have any terrain photos with water? I could use some inspiration for some water hexes.
Thanks again for sharing!
Tanner
-
pmskaar
- E5
- Posts: 2273
- Joined: Sun Apr 17, 2005 5:45 am
Pete's Place
Hi Chris! I do cross over between the light and the dark side although some people that are not in the hobby may regard it all as the dark side.
My primary collecting and gaming interests right now are as follows in no particular order.
1. WWII Russian Front.
2. WWII North Africa
3. WWII NW Europe.
4. Cold War gone hot - 1975 on.
5. Arab-Israeli Wars particularly the 1967 and 1973 Wars.
I have an interest in doing Vietnam sometime too but have too many irons in the fire to put any effort in doing that right now. My Cold War era stuff is probably my most recent era to actually paint anything. I now have a BMP-1 and BMP-2 battalion plus a few BRDMs at the scale of 1 vehicle stand = 1 platoon. I still need tanks and a lot of supporting stuff like helicopters and air assets. I also need to work on my NATO forces at some point.
My friend, Begemot, has provided me with 5 each painted M-1s and M-60A3s for my NATO starter force. These were gifts for Christmas/Birthday and are really well done as one would expect from the great Begemot. The M-60A3s are painted in 3AD three tone MERDC.
My primary collecting and gaming interests right now are as follows in no particular order.
1. WWII Russian Front.
2. WWII North Africa
3. WWII NW Europe.
4. Cold War gone hot - 1975 on.
5. Arab-Israeli Wars particularly the 1967 and 1973 Wars.
I have an interest in doing Vietnam sometime too but have too many irons in the fire to put any effort in doing that right now. My Cold War era stuff is probably my most recent era to actually paint anything. I now have a BMP-1 and BMP-2 battalion plus a few BRDMs at the scale of 1 vehicle stand = 1 platoon. I still need tanks and a lot of supporting stuff like helicopters and air assets. I also need to work on my NATO forces at some point.
My friend, Begemot, has provided me with 5 each painted M-1s and M-60A3s for my NATO starter force. These were gifts for Christmas/Birthday and are really well done as one would expect from the great Begemot. The M-60A3s are painted in 3AD three tone MERDC.
-
pmskaar
- E5
- Posts: 2273
- Joined: Sun Apr 17, 2005 5:45 am
Pete's Place
Hi Tanner!
1. Mold seam lines. I remove mine starting with a #11 hobby knife and carefully scrape along the line. I try to get most of the material off this way and sometimes it's almost all I need.
I also use a hobby file on occasion to file down some of those little bits and nubs that also appear on the castings that need to be removed.
As a final step, on areas that are generally flat, I use fine steel wool to smooth things out. This will get rid of any visible scrape marks on the side something like a Panther turret.
2. Water effects. I will offer a small tutorial with pictures on how I do my water effects. I have posted this on Facebook but I will post it here, in Pete's Place. Coming soon!
1. Mold seam lines. I remove mine starting with a #11 hobby knife and carefully scrape along the line. I try to get most of the material off this way and sometimes it's almost all I need.
I also use a hobby file on occasion to file down some of those little bits and nubs that also appear on the castings that need to be removed.
As a final step, on areas that are generally flat, I use fine steel wool to smooth things out. This will get rid of any visible scrape marks on the side something like a Panther turret.
2. Water effects. I will offer a small tutorial with pictures on how I do my water effects. I have posted this on Facebook but I will post it here, in Pete's Place. Coming soon!
-
pmskaar
- E5
- Posts: 2273
- Joined: Sun Apr 17, 2005 5:45 am
Pete's Place
Hi Tanner!
1. Mold seam lines. I remove mine starting with a #11 hobby knife and carefully scrape along the line. I try to get most of the material off this way and sometimes it's almost all I need.
I also use a hobby file on occasion to file down some of those little bits and nubs that also appear on the castings that need to be removed.
As a final step, on areas that are generally flat, I use fine steel wool to smooth things out. This will get rid of any visible scrape marks on the side something like a Panther turret.
2. Water effects. I will offer a small tutorial with pictures on how I do my water effects. I have posted this on Facebook but I will post it here, in Pete's Place. Coming soon!
1. Mold seam lines. I remove mine starting with a #11 hobby knife and carefully scrape along the line. I try to get most of the material off this way and sometimes it's almost all I need.
I also use a hobby file on occasion to file down some of those little bits and nubs that also appear on the castings that need to be removed.
As a final step, on areas that are generally flat, I use fine steel wool to smooth things out. This will get rid of any visible scrape marks on the side something like a Panther turret.
2. Water effects. I will offer a small tutorial with pictures on how I do my water effects. I have posted this on Facebook but I will post it here, in Pete's Place. Coming soon!
-
WWIICentral
- E5
- Posts: 169
- Joined: Sat Sep 03, 2011 6:59 am
- Contact:
Thanks Pete, I don't have a Facebook account but I'll join with my Wife's (she's getting sick of all the miniatures in her feed, lol). I'll see if I can find the tutorial there so you don't have to repost so much. Thanks for the tips and the advice! I suppose I need to get better with my #11 Xacto...
Tanner
Tanner
-
Begemot
- E5
- Posts: 249
- Joined: Fri Aug 19, 2011 12:11 am
Pete - Superb T-34s. Great paint job. Good choice of color for the tanks. But just as amazing are your photos. Great lighting. The photos almost look like the tanks are the real thing.
Begemot
Begemot
The summer grasses.
For many brave warriors
The aftermath of dreams.
--- Basho
Please visit my website "Lair of the Begemot": (https://lairbegemot.blogspot.com)
For many brave warriors
The aftermath of dreams.
--- Basho
Please visit my website "Lair of the Begemot": (https://lairbegemot.blogspot.com)
-
panzergator
- E5
- Posts: 3688
- Joined: Thu Oct 08, 2015 3:44 am